I’ve moved to www.megan-amaidensportion.blogspot.com
Check out this great giveaway over at Baker’s Royale! Click HERE.
Posted in Giveaways | Leave a Comment »
Yummy Italian style dish that is also great for people on a Daniel Fast! I used whole grain penne pasta for this, but you can use any kind of pasta of your liking. To add even more great flavor, add some pesto sauce!
Ingredients:
2 tbsp olive oil
3 cloves garlic
1/2 red pepper, diced
*1 jar sun dried tomatoes, drained (about 3/4 cup dry, rehydrated)
1 cup artichoke hearts, sliced
1/3 cup sliced black olives (optional, I don’t like olives so I left these out)
1/3 cup fresh chopped basil
1 box penne pasta, cooked
Preparation:
Sautee garlic in olive oil for a minute or two, then add the red peppers and basil. Cook for another minute or two, then add the tomatoes, artichoke hearts, olives and basil and allow to cook until heated through, stirring frequently.
* I would advise cutting up the sun-dried tomatoes before putting them in the pan.
Posted in Cooking, Daniel Fast, Easy, Main Dish | Leave a Comment »
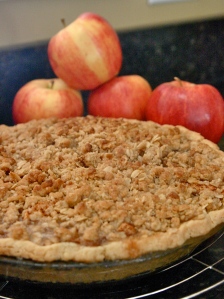 I love Autumn. It has got to be my favorite season. I think I even want to get married during the Fall. All the food would be homemade style surrounded by harvest decor, and pies, did I mention that I want lots of pies? Mmmmm…Whoops! Okay, Megan, stop daydreaming. Haha!
I’m gonna be honest with ya. Pies have always been intimidating to me. I think because of the crust. I have no idea why. Ever since I was child I would watch my grandmothers make them and somehow, someway I got it in my head that pies are hard…Until today 🙂
Ladies and Gentlemen, I would like to present to you my very first Apple Pie. I’m so excited (and I’m sure my future husband will appreciate it someday too ;). I kind of felt like Ma Ingalls in the kitchen today!
I found this recipe on one of my newest favorite sites, My Baking Addiction. I have posted the recipe below, but I would also encourage you to visit the other site as well. And once again, I hope you enjoy this recipe and have a wonderful, blessed day!
*Pie Crust adapted from allrecipes
*This crust turned out so well, but, once again, I will be honest….I like my Amma’s crust better.
Ingredients:
2 cups all-purpose flour
3/4 cup and 2 tablespoons shortening
1 tablespoon and 1-1/2 teaspoons white sugar
1 teaspoon salt
1/2 egg
1/4 cup water
Directions:
In a large mixing bowl, combine all-purpose flour, shortening, sugar, and salt. Blend together with a pastry cutter until crumbly.
In a small bowl, mix egg with water. Blend into flour mixture. Chill in refrigerator until ready to use.
Notes: I halved the original recipe which was perfect for a 9 inch deep dish pie plate. The recipe I posted is the halved version.
Apple Pie Filling adapted from allrecipes
Ingredients:
1/2 cup unsalted butter
3 tablespoons all-purpose flour
1/2 cup white sugar
1/2 cup packed brown sugar
1/4 cup water
6 Granny Smith apples – peeled, cored and sliced (my apples were large 6 were perfect)
2 tsp cinnamon
1/4 teaspoon freshly grated nutmeg
Directions:
1. Melt butter in a sauce pan. Stir in flour to form a paste. Add white sugar, brown sugar and water; bring to a boil. Reduce temperature, and simmer 5 minutes.
2. Toss the apples with the cinnamon and nutmeg.
3. Meanwhile, place the crust in your pan.
4. Fill with apples, mounded slightly. Gently pour the sugar and butter liquid over apples. Pour slowly so that it does not run off. Cover with crumb topping (recipe below).
Bake 15 minutes at 425 degrees F (220 degrees C). Reduce the temperature to 350 degrees F (175 degrees C), and continue baking for 35 to 45 minutes.
Oatmeal Streusel Topping
1/2 teaspoon ground cinnamon
1/4 teaspoon ground nutmeg
3/4 cup all-purpose flour
1/2 cup packed brown sugar
3/4 cup rolled oats
1/2 cup butter; slightly softened
Prepare Oatmeal Streusel Topping by combining flour, teaspoon cinnamon, nutmeg, brown sugar, and oats. Mix thoroughly, then cut in butter until mixture is crumbly.
Posted in Baking, Desserts, Easy, Pies | 1 Comment »
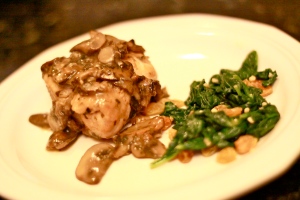
Well, it’s official…I’m on the dinner making list in our home. haha! Oh wait, I forgot to write that I am back in KY at the moment on what you could call my “1st official furlough”. It feels wonderful to be home for awhile! It’s kind of fun to be able to bake pretty much whatever I want because there’s no question if I can acquire the ingredients that I need or not. I can make quite a bit in Thailand, but ingredients can be quite limited.
Anyway, all that to say, I made dinner tonight for my mom and dad and I. We have been trying to come up with more ways to cook chicken, so I’ve been searching the internet like crazy lately to find some recipes. This one I found on Eat Better America. It is very good! We don’t have marsala, so I replaced it with cooking sherry (which is what was advised to use if you do not have the original ingredient. That, or chicken broth) and it tasted just fine. We are sauce people, so we actually came to the conclusion to double the recipe for the sauce next time. The recipe also calls for fresh mushrooms, but does not say what kind. I chose small bellas and they were wonderful.
For a side dish, I made Martha Stewart’s sauteed spinach with golden raisins. Very good as well.
Both dishes were amazingly easy to make. I hope you try them and enjoy them as much as we did! =)
Posted in Cooking, Easy, Food, Lower Fat, Main Dish, Quick, Side Dishes, Substitutes | 2 Comments »
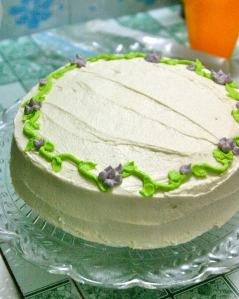 The other day I was given the opportunity to bake a cake for a friend of mine here in Thailand that is graduating from high-school. I was so excited to finally have an excuse to make a cake again! I quickly turned to my never fail, Better Crocker cook book and came up with a nice/sweet concoction =)
I was a little nervous though, cause I’m no artist (unless I have some hidden artistic ability within that…well…is still hiding) and even though my friend’s mom never requested anything specific, I really wanted to bless my friend by making the cake with more than just plain white frosting. So, I started to mix some colors with my limited about of food coloring, popped in one of the two or three tips I could find, prayed and started moving my hand. For this being only my second cake to actually try to decorate with more than just a fanned strawberry or chocolate chips, I loved how it came out. Simple and sweet 🙂
Ingrediants:
Starlight Yellow Cake ~
2 1/4 cups all-purpose flour*
1 1/2 cups sugar
1/2 cup butter or stick margarine, softened
1 1/4 cups milk
3 1/2 tsp baking powder
1 tsp salt
1 teaspoon vanilla**
3 large eggs
1.) Heat oven to 350 degrees. Grease bottom and sides of 2 round pans with shortening; lightly flour.
2.) Beat all indrediants with electric mixer on low speed 30 seconds, scraping bowl constantly. Beat on high speed 3 minutes, scraping bowl occasionally. Pour into pans.
3.) Bake 25-30 minutes, or until toothpick inserted in center comes our clean or until cake springs back then touched lightly in center. Cool rounds 10 minutes; remove from pans to wire rack. Cool completely, about 1 hour.
4.) Split the layers into two more layers so as to make four. Generously fill with White Mountain Frosting and cover cake with Vanilla Buttercream Frosting.
White Mountain Frosting ~
1/2 cup sugar
1/4 cup light corn syrup
2 TBSP water
2 large egg whites
1 tsp vanilla
1.) Mix water, sugar and corn syrup in 1-quart saucepan. Cover and heat to a rolling boil over medium heat. Uncover and boil 4 to 8 minutes, without stirring, to 242 degrees on candy thermometer or until small amount of mixture dropped into cup of very cold water forms a firm ball that holds its shape until pressed. FOr an accurate temperature readying tilt saucepan slightly so mixture is deep enough for the thermometer.
2.) While mixture is boiling, beat egg whites in medium bowl with electric miser on high speed just until stiff peaks form.
3.) Pour hot syrup very slowly in thin stream into egg whites, beating constantly on medium speed. Add vanilla. Beat on high speed about 10 minutes or until stiff peaks form.
Vanilla Buttercream Frosting*** ~
3 cups powdered sugar
1/3 cup butter
1 1/2 tsp vanilla
1 to 2 TBSP milk
1.) Mix powdered sugar and butter in medium bowl with spoon or electric mixer on low speed. Stir in vanilla and 1 tablespoon of the milk.
2.) Gradually beat in just enough remaining milk to make frosting smooth and spreadable.
*If using self-rising flour, omit baking powder and salt
**I always add a bit more vanilla than the recipe calls for.
***For my cake, I doubled the Buttercream frosting.
Posted in Baking, Cake, Desserts, Time Consuming | Leave a Comment »
Weeeellll…
First of all, making a dessert isn’t always an easy thing to do here in Thailand. Not that this one was super hard or anything, but I can’t always get exactly what the original recipe calls for.
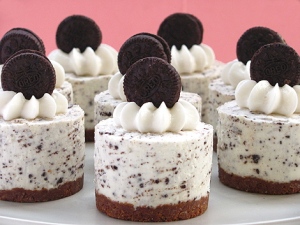
In this case , I was supposed to use a couple of tablespoons of lemon juice. I can’t get a bottle of lemon juice here like I could in America. I can get lemons however, but they were too expensive for me buy this month so I asked a friend here what I should do. She advised using lime juice instead. So I did. Unfortunately that was a mistake! Unless of course you want a “Lime and Cream No-bake Cheesecake”! Ah, alas, my hopes of having a piece of oreo cookie goodness were dashed quite to the ground 😦
The texture of this dessert however was very nice, and I do want to try this one again. Needless to say, without the lime juice. Here is the link to the recipe : http://www.bakersroyale.com/cheesecake/oreo-cookies-and-cream-no-bake-cheesecake/ Despite my somewhat failed attempt, please try it and tell me how yours turned out!
Posted in Desserts, Easy | Leave a Comment »
Posted in Desserts | 1 Comment »
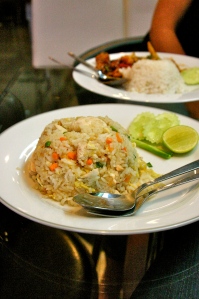
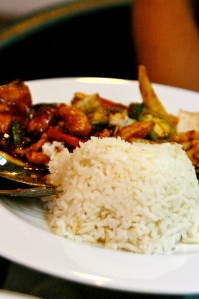
My friend, Christina, and I had lunch together today and I thought that the food we ordered were pretty good examples of what we eat quite often over here. These two dishes are called, ข้าวผัด (khowpat a.k.a fried rice) and Cashew chicken and veggies. Both are served กับข้าว (with rice). Please keep in mind that this is what our food looks like in a nice restaurant. Most of the time we order our food to go, so it’s usually stuffed into little boxes and placed in a plastic bag with a plastic spoon 🙂
~ Fried Rice ~
~ Cashew Chicken with Vegetables ~
Posted in Food, Main Dish, Random, Thai Dishes, Thailand, Uncategorized | Leave a Comment »
